Table of Contents
Test Plan for N415RJ____________________________________________________ 1
Table of Contents________________________________________________________ 2
Introduction____________________________________________________________ 3
Forward and Acknowledgements__________________________________________ 3
Objective of Test Plan___________________________________________________ 4
Test Plan Format_______________________________________________________ 5
General Test Documentation
Methods_____________________________________ 5
Instrumentation - See Appendix
XXX_______________________________________ 6
Aircraft Configuration___________________________________________________ 6
Preparation_____________________________________________________________ 6
Airport selection_______________________________________________________ 6
Emergency Plans and Equipment__________________________________________ 9
Test Pilot Qualification
Criteria__________________________________________ 12
Transporting The Aircraft To
The Airport__________________________________ 13
Assembly and Airworthiness
Inspection___________________________________ 14
Weight and Balance____________________________________________________ 15
Paperwork Required___________________________________________________ 15
Electromagnetic Interference
(EMI) Testing_______________________________ 17
Power Plant Tests_____________________________________________________ 18
Propeller Inspection___________________________________________________ 23
Taxi Tests_____________________________________________________________ 24
Objectives___________________________________________________________ 24
Data to be Collected___________________________________________________ 24
Test Procedure_______________________________________________________ 25
Flight Tests___________________________________________________________ 28
Chase Plane Procedures________________________________________________ 28
Emergency Procedures_________________________________________________ 29
Flight Procedures_____________________________________________________ 30
Data Analysis (to be expanded on)_________________________________________ 47
Appendix 1. Aircraft Condition Inspection Checklist
(Airworthiness Inspection) (to be expanded on) 48
Appendix 2. Aircraft Normal Procedures Checklist (to be expanded on)__________ 52
Appendix 3. Aircraft Emergency Procedures Checklist (to be expanded on)________ 57
Appendix 4. Test Cards (one for each planned test/flight
to include engine run in and taxi testing) (to be expanded on)___________________________________________________________ 59
Appendix 5. Aircraft Squawk Record (suggested format) (to be expanded on)______ 60
Appendix 6. Glossary___________________________________________________ 62
Appendix XXX. Instrumentation Drawings and Schematics____________________ 63
Appendix YYY. Weather minimums________________________________________ 64
Appendix XYZ. Root Cause Analysis Methods_______________________________ 65
Appendix ZZZ. Flight Manual Preparation and Publication (to be expanded on)__ 66
Introduction
Forward and Acknowledgements
Flight testing is a serious business. Aviation is very unforgiving of mistakes, and
in the flight test arena the mistakes you have to deal with may have been made
well before the airplane was ready to fly, back when it was still a pile of
sticks in your garage or basement (or living room?). The only safety net you have available to you
in this type of arena is a well thought out, disciplined test plan that you use
as your bible for exactly how you will operate during the test period. To safely conduct your own test program on
the aerospace vehicle you have created,
you must adequately prepare both the airplane and YOURSELF to complete
the test program. This document will
help you take a step in the right direction toward accomplishing that
goal. It’s not perfect, and at this
point by no means complete, but perhaps some of the information in it will help
you to think through your personal requirements for performing the test program
required for your airplane.
I am developing this plan for the express purpose of testing
N415RJ, my KR-2S, and it is provided for home builders to use as a guide to
performing a safe and thorough test program.
The plan is loosely based on AC 90-89A, Amateur-Built Aircraft and
Ultralight Flight Testing Handbook, dated 5/25/95, and includes suggestions and
contributions from members of the KRNet.
KRNet is a free Internet mailing list devoted to the open exchange of
information pertinent to building and flying KR aircraft. You can subscribe to the KRNet mailing list
by sending an email message addressed to majordomo@teleport.com, with
“subscribe krnet-l [your email address]” in the body text.
This plan is a guide for the execution of my KR-2S test
program, and as such is not a “stand-alone” document. It does not contain guidance for trouble
shooting or correcting deficiencies found during testing. I recommend “Flight Testing Homebuilt
Aircraft” by Vaughan Askue, ISBN 0-8138-1308-5, as a basic starting point for
determining how to address deficiencies.
This book also explains in some detail many of the principals and procedures
I have included in my test plan, and it contains references for more ideas on
testing and corrective action.
Special thanks to Jeff Scott, Ron Lee, Bob Lee, Peter
Leonard and his friend Fred Lindsley for their comments, suggestions, and
contributions. Also to Major Dan
“Dragon” Draeger, Commander of the 592nd Flight Test Squadron at Holloman Air Force
Base, NM, and Commander Pat “P.J.” Quinn, United States Navy (Retired), for
their expert review and recommendations.
If I’ve missed anyone, I apologize, and I’m sure you’ll let me know
about it…. ;-}
WARNING:
The contents of this test plan are offered as a guide for individuals to
reference while testing their experimental aircraft. It is the responsibility of the builder, test
pilot and his support team to determine the safety and applicability of the
information contained in this plan.
Under no circumstances should the test program extend beyond the
capabilities of the test pilot or the aircraft being tested. These capabilities must be
assessed by a qualified and disinterested third party. ALL ELEMENTS OF THIS PLAN ARE
TO BE EXECUTED AT THE SOLE RISK OF THE TEST PILOT AND THE AIRCRAFT BUILDER.
Objective of Test Plan
The objective of this test plan is
to prepare N415RJ for safe operation and determine the aircraft’s controllability
and performance throughout the flight envelope for which it was designed. Data will be collected and recorded for all
phases of the test program, particularly on any hazardous operating
characteristics or design features. This
data will be used to develop a comprehensive Flight Manual that specifies the
aircraft’s performance parameters and defines its operating envelope.
Test Plan Format
The plan for each phase of ground
and flight test will consist of the following elements: Title (Description), Objective, Data Points
to be Collected, Test Procedure, and Risk Analysis. Test cards, provided in Appendix 4, contain
the test procedures in checklist format to be used by the test pilot and
support team in conducting the tests and recording data. I have developed test cards up through the
first flight, sized to fit a knee board, and they are stored in a separate file
on my web page. The only thing missing
from these cards are the operating limitations for each test, as I plan to post
a separate card on my instrument panel with this information for each
test. This information is critical to
the safe operation of the aircraft, so post it where it can be referenced
immediately and effortlessly. An ideal
place to post this information is beside the airspeed indicator or in an open
space on the panel that is within your cross check.
General Test Documentation Methods
All tests in this plan will be
documented with 8mm video tape from a video camera secured to the center of the
baggage shelf and aimed forward (see Appendix XXX for details). The camera field of view will be adjusted to
include the cockpit instruments and as much of the “out the window” view over
the nose of the aircraft as possible.
The camera will be positioned as high as practical to maintain the
horizon in the field of view. Audio will
be input to the video camera directly from the aircraft intercom to allow the
test pilot to provide additional verbal descriptive data regarding flight parameters
and aircraft handling characteristics.
Flight parameter and engine
performance data will also be collected via serial output from the RMI uEncoder
and uMonitor. Output from these
instruments will be collected on a laptop computer and time stamped for later
review with the video tape. This data
will be the primary source for performance information in the Flight
Manual. Reference Appendix XXX for
instrumentation details.
Specific data points during each
test will be recorded manually to augment/back up the automated data collection
methods. A data card which describes the
required starting/entry parameters for the test and the specific data points to
be recorded manually will be developed for each test to be performed. The test pilot will relay data points by
radio to the support team for manual recording on the ground.
Instrumentation - See Appendix XXX
Aircraft Configuration
The Junkin KR-2S N415RJ is a conventional gear aircraft with a 78 horsepower turbo-charged Revmaster 2100DT engine. It was built using the Rand Robinson premold top deck and Diehl wing skins and gear legs. The aircraft is built to plans without modification, and has a center stick in the two place cockpit. The throttle and mixture control quadrant is located on the left side of the fuselage. The instrument panel is configured for day or night VFR flight, and uses digital avionics and instruments. Header tank fuel quantity is continuously displayed, and wing tank quantity is displayed on the same gauge by selecting the left or right tank and pressing a momentary contact switch. All flight controls are actuated by cables. An electric trim system is used for both elevator and aileron trim. Hands On Throttle And Stick ergonomics are incorporated, allowing the following systems to be activated without the pilot removing his hands from the stick or throttle: engine start, fuel transfer pump, elevator trim, aileron trim, push to talk, frequency flip-flop, transponder ident, strobes on/off, and landing light on/off.
Preparation
Airport selection
Objective
To select a suitable airport at which to conduct the taxi and flight test program.
Data to be collected: For each airport considered, collect the following information. Consider that taxi tests and flight tests may be conducted at different airports if necessary.
Runway
headings
Multiple runways and taxiways oriented in the direction of local prevailing winds will help assure the ability to conduct test operations in changing weather conditions. The best conditions for taxi and flight testing are little or no wind and clear VMC (visual meteorological conditions).
Obstructions
Airports surrounded by buildings, power/telephone lines, trees, or other obstructions should be avoided. If obstructions are present, careful planning will be required to determine the safest departure route from the airport that affords the test pilot with the most options in the event of engine failure or other catastrophic failure on takeoff and climb out. Likewise, the approach to landing must be planned so as to determine the approach path that affords the most options in the event of emergencies during approach to landing.
Runway
condition
Runways and taxiways should be in sound condition (no major cracks or holes) and free of loose gravel, sand, or other debris. Grass or dirt runways must be thoroughly inspected for holes, ruts, or other irregularities that could cause problems. Runway access should be controlled by the airport authority or a member of the support team, and limited to only aircraft and emergency vehicles. Coordinate with the FBO, airport manager, or other controlling agency to establish access procedures.
Airport
facilities
Minimum airport facilities should include a protected storage area for the aircraft, a fuel source, and access to a telephone (a cellular phone with extra batteries will suffice – check cellular network coverage). Larger airports tend to have better facilities, but traffic volume often makes them impractical for flight testing.
Airport
traffic volume
High volume airports should be avoided. If you must use a high volume airport, talk to the FBO or control tower to determine when the traffic volume is typically the lowest, and plan your test activities for these periods.
Fire
fighting equipment
Fire fighting equipment on the field is a definite plus, but not necessarily a requirement. The availability of this equipment will determine any additional equipment the ground crew must have at hand in the event of a fire. Hand held extinguishers will work, but an industrial grade fire bottle hitched to the back of the ground crew’s 4 wheel drive vehicle could prove to be a life saver. Check with the FBO to see if they have this equipment available.
Emergency
response team availability
In most cases the ground crew will have to serve as the emergency response team. Again, check with the FBO or tower for any established emergency response personnel or procedures, and determine what coordination is required to get the ground crew and vehicle access to the active runway.
Emergency
landing fields
Survey the area surrounding the airport for emergency landing fields. Be realistic in your assessment, and approach this survey from the standpoint that you WILL have to land the airplane immediately after takeoff. The ideal airport will have a rural road with no telephone or power lines, running within 30 degrees of the departure end of the runway. Beware of farm fields, and be sure to take a walk through any fields you are considering using as emergency landing areas. Take a look at these fields again within one week of each flight to reconfirm that they haven’t been plowed, planted, or otherwise made unsuitable for use as an emergency landing strip. The objective is not necessarily to land the airplane without damage (although that would be IDEAL!), but to be able to put the airplane on the ground in such a manner that you will be able to walk away from it. If no emergency fields are available, or you don’t feel confident in your ability to land the aircraft in the areas available, pick another airport. Remember, you WILL have to land your airplane immediately after takeoff.
The following parameters were extracted from AC 90-89A, Amateur-Built Aircraft and Ultralight Flight Testing Handbook dated 5/24/95, page 3. The aircraft wing loading assumed for the flight test phase is 12.5 pounds per square foot, and yields the following required take-off distances. These distances are for reference when choosing an appropriate site for both taxi and flight testing. Actual distances peculiar to N415RJ will be determined during testing.
Distance to take off at minimum smooth lift off speed, fly for 5 seconds without climbing, land and stop straight ahead |
2,800 feet. |
Distance to reach smooth lift off speed |
700 feet |
Distance covered in 5 seconds of flight at minimum lift off speed |
550 feet |
Distance to stop from minimum smooth lift off speed (including air and ground distance) |
1600 feet |
Distance to take off at slow approach speed and climb at 1 foot vertical per 20 feet lateral to an altitude of 50 feet |
1900 feet |
The ideal runway at sea level is at least 4,000 feet long and 100 feet wide. Add 500 feet for each 1,000 feet increase in elevation.
Emergency Plans and Equipment
Ground Crew.
The ground crew should consist of a minimum of 2 experienced individuals with the following responsibilities:
Assist the test pilot in ensuring that the aircraft is in airworthy condition for safe operation
Provide assistance to the test pilot in an emergency or any other situation in which assistance is required.
The ground crew should have a 4-wheel drive vehicle equipped with a VHF radio, cellular telephone, hand held GPS, sectional chart and road map, fire extinguisher(s), cutting equipment, and a first aid kit. All members of the ground crew must be capable and qualified to operate the emergency equipment.
Ground emergency Plan
Provide a copy of this plan to the ground support crew, the FBO/tower, and emergency response team at the field. The ground emergency procedures should be tailored to the specific operation of N415RJ and its aircraft systems.
Canopy latching/removal (to be expanded on)
Safety harness release procedures (to be expanded on)
Location and operation of the fuel shut off valve(s) (to be expanded on)
Master switch location/OFF position (to be expanded on)
Cowling removal procedures (to be expanded on)
Battery location/access/disconnect procedures (to be expanded on)
Fire extinguisher location and use (to be expanded on)
How
to safe up ballistic recovery system/other pyrotechnic safety devices (to be expanded on)
Engine Failure (to be expanded on)
Runaway Throttle (to be expanded on)
Fire (to be expanded on)
Smoke in the Cockpit (to be expanded on)
Brake Failure/Stuck Brake (to be expanded on)
Wheel/Tire Failure (to be expanded on)
In-Flight Emergency Plan
N415RJ will assume the lead of the formation in all flights involving a chase aircraft unless the lead is passed to the chase aircraft. Situations that would make this necessary are any emergencies that obscure forward vision (oil on the canopy, smoke in the cockpit, canopy bird strike, etc.) The first action of any airborne emergency will be to turn directly to the closest airfield or emergency landing field. Emergency procedures will be executed by the test pilot, and the chase or ground crew will back up and confirm his actions. The test pilot will be the final authority for all decisions, but all members of the support and chase team are encouraged to offer their assessment of the situation and recommended action.
Engine failure on take off (to be expanded on)
Engine failure in flight (to be expanded on)
Flight control malfunction/out of rig (to be expanded on)
Engine/cockpit
fire (to be expanded on)
Engine Overheat (to be expanded on)
Structural Failure (to be expanded on)
Excessive Engine/Prop Vibration (to be expanded on)
Airport.
Brief Emergency Response Team on the above procedures. Advise the tower/FBO personnel that an experimental aircraft test is being conducted. These briefings should be conducted the day prior to the test flight so that all questions can be answered and additional resources, if required, can be obtained.
Hospital Locations/Phone Numbers
Investigate hospitals near the airport and in the designated flight test area and make a list of emergency phone numbers. The test pilot should have any medical allergies or conditions made known to health providers. Wear a medic alert bracelet or other identification prominently. The support team will have a copy of the pilot’s medical history to pass to health providers, if necessary.
Cockpit Fire Extinguisher
A halon fire extinguisher will be secured to the front of the main spar under the pilot’s legs with a quick-release that will allow one-handed access and operation.
Canopy Breaker Tool
The test pilot must have the ability to break through the canopy if necessary. A standard military survival-type knife will serve well for this purpose. The test pilot must be aware of the proper use of a knife to break through the canopy. The knife should be held in one hand, blade up with the sharp edge TOWARD the pilot, and the other hand positioned below the knife to direct the striking motion. The edge of the blade must be toward the pilot to assure that a glancing blow against the canopy will push the knife away from the pilots head -- trust me, it’s how we were trained to do it in the F-4. Several blows may be required to create a hole large enough for egress from the cockpit. Secure the knife in its sheath above the fire extinguisher.
Fire/Pilot Protection
The test pilot will wear a nomex flight suit and gloves, high leather flight boots, and a helmet with a visor. The helmet will have a chin strap that can be securely fastened. The four point lap belt/shoulder harness will also be securely fastened.
Parachute/Ballistic Recovery System
The canopy will be rigged with removable safety pins to allow the pilot to jettison the canopy in an emergency bailout situation. A high-speed rated parachute will be worn by the pilot. This is to permit a high-speed bailout at lower altitudes in the event of structural failure. A ballistic recovery system may be installed in lieu of a personal parachute.
Test Pilot Qualification Criteria
Objective
To establish the minimum qualification and proficiency requirements for the test pilot.
Test Pilot requirements
Physically fit
No alcohol or drugs (prescription or non-prescription) within the 24 hours prior to the test
Rated, current, and competent as assessed by a flight advisor and instructor.
Current medical and biennial flight review
Flight time requirements
At least 100 hours solo time
At least 50 hours and 50 take-offs and landings in a conventional gear airplane, 10 in the last 30 days
Familiar with airport and emergency fields
Has flown in similar/same type
Has had recent instruction or experience in same/ like-type
Has conducted practice flight test profile in same/ like-type
Has studied and practiced all in-flight and ground emergencies with ground crew, and has spent a minimum of 2 hours “chair flying” emergency procedures.
Has logged one hour of unusual attitude recoveries with an instructor within 45 days of flight
Has reviewed expected performance characteristics and studied all available material on the aircraft
Has reviewed NTSB reports on past accidents in same type aircraft
Has become completely familiar with the cockpit and can locate all cockpit switches while blindfolded.
Transporting The Aircraft To The Airport
Objective
Manage the risk associated with transporting the aircraft to the airport in order to avoid damage or incident.
Data to be considered
Weather
Traffic flow/volume
Route
Conveyances available
Moving crew/volunteers
Methods of securing aircraft
Procedure
Confirm weather forecast acceptability
Verify hangar/storage space available
Contact crew
Get trailer/truck
Secure aircraft to trailer/truck
Secure wings to trailer/truck
Brief route/convoy procedures
Move to airport
Brief unload procedures
Unload aircraft and wings
Secure aircraft in storage area
Assembly and Airworthiness Inspection
Objective
Provide for reassembly of the aircraft to minimize risk of damage or improper assembly. Further assure aircraft is in a condition to pass the FAA airworthiness inspection
Data to be considered
Assembly Planning
Assembly Sequence
Assembly Procedures
Aircraft Fitness Inspection Checklists
Procedure:
Assembly Checklist (to be expanded on)
Fitness Inspection Checklist (to be expanded on)
Field Check List (to be expanded on)
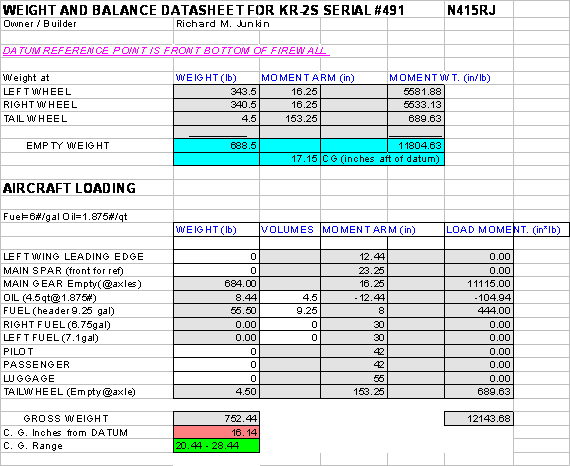
Weight and Balance
Paperwork Required
Objective
Ensure all paperwork is completed for FAA approval for flight testing.
Required Documents
Registration
Weight & Balance
Airworthiness Application
Airman Rating Application for Mechanic’s Certificate (will probably be mailed to the FAA separately)
Signed notarized affidavit stating that the aircraft was homebuilt from parts. This must be on file with the FAA before they can process the Mechanic’s Certificate
Cutaway drawing and/or pictures of the aircraft to go to the FAA
Placards
Operating Limits (projected) marked on instruments
“EXPERIMENTAL”
Passenger Advisory
Aircraft ID Plate
Checklists
Detailed checklists are a must for the first few flights, regardless of how
simple the aircraft is. There are many
distractions on these flights, including your own excitement and the small
crowd that may gather to witness your first flight. Detailed checklists will force you to develop
the good habit patterns that will keep you safely flying your aircraft for as
long as you own it. Here is a list of
checklists you should prepare:
Preflight Inspection
Before Engine Start
Engine Start
15 Minute Checklist (for testing purposes)
Before Taxi
Taxi
Before Take Off
Take Off/Climb/Cruise
Descent/Before Landing
After Landing
Before Engine Shut Down
Engine Shut Down
Securing Aircraft
Emergency Procedures
Flight Manual
Builder’s Log (include pictures and tech counselor inspection forms)
Aircraft Log (This is the only required log for the airplane; engine, avionics, and prop logs are optional)
Engine Log
Prop Log
Avionics Log
Electromagnetic Interference (EMI) Testing
Objective
Ensure that all aircraft systems will operate normally with any combination of on board electrical equipment operating.
Data Points to be Collected
See table in procedures and on test card.
Procedure
All electronic systems on board must be operable in combination with any and all other systems on board the aircraft. These tests must be conducted with the engine running, and can be conducted in conjunction with the engine run-in tests. Use the following matrix to test systems operation. The matrix is filled from left to right, top to bottom, turning all systems off each time the right side of the matrix is reached. Monitor all systems for normal operation, and note any discrepancies by position on the matrix with a description of the abnormally operating system/systems malfunction.

Power Plant Tests
Objective
Ensure engine has been properly run-in in accordance with Revmaster’s recommendations and is safe to operate in all RPM ranges. Ensure an adequate fuel supply and flow rate at all angles of attack.
Data Points to be Collected (need to state expected/limit parameters, and address instrumentation)
Usable fuel quantity
Fuel flow rate
Engine compression baseline
Ignition system performance
EGT/CHT parameters
Carburetor heat parameters
Mixture control
Idle speed
Evidence of leaks
Test Procedures
Pre-oil and cold compression test
Tools Required
Remove the rocker-box covers and one spark plug from each cylinder.
Using an external oil pump, or by rotating the propeller in the direction of rotation, pump a substantial amount of oil up from the sump into the rocker arms.
When the engine is pre-oiled, run a compression test of each cylinder. The results of these compression tests will serve as bench marks for subsequent compression checks.
Run-in procedures
Tools Required
Pre-run-in checks
Confirm all fuel and oil connections are tight.
Confirm adequate torque on engine mount bolts. Reference Revmaster manual for torque values.
Confirm all tools, rags, hardware, or other foreign objects have been removed from the engine and engine compartment.
Confirm 3.5 quarts of oil are in the engine.
Test and support equipment
Inventory a “pack-up” kit prior to
beginning testing. The kit will include
the following:
Operating CHT gauge to confirm proper flow of cooling air.
If only one CHT thermocouple, attach it to the rearmost cylinder on the right side (as viewed from the cockpit) of the engine.
Calibrated external oil pressure and temperature gauges
Use to test the accuracy of the installed gauges.
At least 50 feet of tiedown rope
Tiedown stakes
Two chocks for each wheel
Fire extinguisher
Assorted hand tools
Safety wire
Cotter pins
Ear and eye protection
Grease pencils
Logbooks
Clip board
Pen and paper
Watch to time tests
Rags
Engine manufacturer’s instructions
Test Plan and Test Cards
Safety Precautions
Ensure aircraft is tied down, brakes on, and wheels chocked
All test personnel must wear eye and ear protection
All personnel must be checked out on the operation of the fire extinguisher(s)
Establish a “Hazard Zone” beside the engine, in line with and near the prop, and do not allow anyone in this zone while the engine is running. Paint the outline of this zone on the hangar floor or taxiway.
The first engine run (use Revmaster’s recommendations)
Engine cool down (use Revmaster’s recommendations)
After shut down (use Revmaster’s recommendations)
Record engine run data (to be expanded on)
Mixture
& Idle speed check
After completing the initial run-in tests, determine if the mixture and idle settings are correct by performing the following procedures
Warm up the engine until all readings are normal IAW Revmaster’s specifications
Oil pressure
Oil temp
CHT
EGT
Adjust the engine to the recommended idle RPM
Slowly pull the mixture control back to idle cut-off
Measure and record the change in RPM just before the engine quits. Adjust the mixture setting to achieve a 50 RPM rise at shut down If it does not rise at all, the mixture is too lean. If it rises more than 50 RPM, the mixture is set too rich.
Set the idle RPM about 100 RPM higher than the manufacturer’s recommended idle RPM during the first 10 hours of the flight testing phase to ensure the engine will not quit when the throttle is retarded too rapidly, especially during approach to landing.
Ignition
check
When a magneto check is performed, the engine should continue running smoothly with a slight RPM drop when running on one magneto. The average drop should be about 50 RPM.
A “hot magneto” check should also be performed to confirm proper grounding of the magnetos. If the engine does not quit when the magnetos are turned off, one or both of the magnetos are not grounded, and THIS MUST BE CORRECTED IMMEDIATELY! The most likely causes of a hot magneto are a broken “P” lead or a bad magneto switch. Investigate fully and do not proceed further until this discrepancy is fixed.
Cold
cylinder check
If the engine is running rough and ignition is believed to be the problem, perform a cold cylinder check.
Run the engine on the suspect magneto for about 30 seconds at 1200 RPM. Leave the magneto switch on this magneto and shut the engine down with the mixture control. Have a member or members of your test crew immediately make marks with grease pencils about one inch from the cylinder heads on the exhaust stacks. The marks should turn gray-white in color. If the marks don’t burn on one or more cylinders, these cylinders are cold. This can be caused by bad spark plugs, bad ignition wires, or a cracked distributor in the magneto. To determine if the spark plugs are the problem:
Trade the spark plugs from a known cold cylinder with a known good cylinder. Run the test again, and if the previously good cylinder is now cold, and the other cylinder is good, the spark plugs are the problem.
Carburetor
heat check
The carburetor heat on a normally aspirated engine should raise the venturi temperature by 90F degrees, and on a turbocharged engine by 120F degrees at 75% power. It is important to get these temperatures right, as not enough heat will not melt/prevent ice, and too much will cause the engine to lose power or shut down due to too rich a mixture. The temperature rise should be accompanied by a decrease in engine RPM.
Fuel
flow and usable fuel check
Perform this check to make sure the aircraft will receive an adequate fuel supply at extreme angles of attack.
Raise the aircraft’s nose to an angle 5 degrees higher than the highest anticipated climb angle. For an aircraft with conventional gear, dig a hole to put the tail in rather than put the mains on blocks to achieve this. For a tri-gear aircraft, make a ramp for the nose gear. Ensure the aircraft is securely chocked and tied down.
With a minimum known quantity of fuel in the aircraft, disconnect the fuel line from the carburetor, start a stop watch, and allow the fuel to drain into a container. For a gravity feed system, the flow rate should be 150% of that required by the engine at full throttle. For a pressurized system, it should be at least 125%. When the fuel stops flowing, stop the watch and determine how much fuel drained out and how much fuel is left in the airplane (the “unusable fuel”). Calculate the fuel flow rate.
The formula for estimating the required fuel flow rate (pounds per hour)is .55 X engine horsepower X 1.50. Divide this by 60 to get pounds per minute, then divide this by 6 to get gallons per minute. For a pressurized system use 1.25 instead of 1.50 in the equation.
Ensure the contaminated fuel is disposed of properly.
Post
run-in compression check
Perform a differential compression check on all cylinders after the run-in is completed. Any cylinder yielding less than 60/80 when hot needs to be investigated further. Have an assistant hold the propeller at top dead center for the suspect cylinder, apply compressed air to the cylinder, and listen for escaping air. If air escapes through the exhaust system, the exhaust valve seat is bad. If air escapes through the air cleaner or carburator heat box, the intake valve seat is bad. If air escapes through the oil dip stick tube, the piton rings are bad.
Last
check (before taxi tests)
After all the run-in checks and post-run-in checks are completed, change the oil and oil filter again. Check the old oil and filter for signs of metal, visually inspect the engine and perform a run-up check, then inspect for leaks. THERE ARE NO SUCH THINGS AS MINOR PROBLEMS AT THIS POINT. Do not continue with taxi testing until all engine discrepancies are fixed.
Propeller Inspection
Objective
Develop
and implement an ongoing inspection and maintenance process for the propeller.
Procedure
Inspect propeller for nicks and scratches. Blend/profile leading edge nicks to relieve
stress concentrations, and refinish prop as necessary.
Inspect the prop hub bolts for security. Ensure that the nuts have not backed off by
examining the paint marks on the nut side.
Ensure any loosened nuts are re-torqued and remarked.
Enter any maintenance actions into the propeller log book.
Taxi Tests
Objectives
Confirm that the pilot has access to and can operate all cockpit equipment with seat belt and shoulder harness properly fitted.
Ensure the aircraft tracks straight and there is adequate directional control at 80% of the anticipated take off speed.
Determine that the aircraft’s engine cooling and brake systems are adequate for extended ground operation.
Predict the flight trim of the aircraft and it’s handling characteristics during take off and landing.
Determine the aircraft’s high speed handling and braking parameters
Allow the pilot to become proficient with the ground handling and braking characteristics of the aircraft.
Data to be Collected
Tail lift speed (estimated at 80% of expected stall speed)
Take off speed
Engine performance/temps
Required control inputs (control stick movement as a percent of total range)
Proper instrument function
Braking performance
Ground handling characteristics
Evidence of leaks
Test Procedure
Preparation
For a conventional gear aircraft, support the tail of the aircraft to the approximate take off attitude and allow the test pilot about an hour to familiarize himself with the change in the deck angle from the taxi to take off attitude. This preparation will help reduce the risk of the test pilot overreacting to an unexpected deck angle on the first flight.
Review the brake manufacturer’s recommendations on conditioning the brake linings prior to commencing the taxi tests. Be sure to follow these recommendations so as not to degrade the high speed braking performance you will depend on during later testing and operation.
Review brake failure emergency procedures.
Low Speed Taxi Tests
Execute Preflight, Before Engine start, Engine Start, and Before Taxi checklists
Begin taxi testing in an open area away from hangars and obstructions. The initial taxi tests should be done at a speed no faster than a man can walk. Taxi straight ahead and assess brake effectiveness, landing gear alignment, drift, and ground handling qualities.
Execute 90, 180, and 360 degree turns, with and without brakes, to establish the turn radius capabilities. Continue these exercises until the aircraft can be competently controlled.
Closely monitor engine instruments to maintain all operating parameters within limits.
Ground crew will monitor the aircraft for signs of smoke, fire, fluid leaks, or other anomalies. Use prebriefed signals to indicate problems.
Confirm proper operation of flight instruments and avionics during taxi (compass, turn coordinator, VVI, radios).
Execute Before Engine Shut Down and Engine Shut Down checklists.
Carefully inspect the aircraft for oil and brake fluid leaks. ALL LEAKS ARE TO BE CONSIDERED MAJOR PROBLEMS AND THE TEST PROGRAM DISCONTINUED UNTIL THEY ARE FIXED!
High Speed Taxi Tests
Ensure the test pilot and the test aircraft are prepared to become airborne during high speed taxi testing. It has happened before, and with a little preparation an accidental excursion into the surlies can be handled as a non-event. Thoroughly review the test plan for the first flight before beginning the high speed taxi tests, and ensure the aircraft is in a flyable configuration. Be sure to conduct the taxi tests with the appropriate amount of fuel (the same amount you will use for your first flight), and confirm that the CG is accurately calculated and falls within the design limits. Approach this phase of testing as if you were going to fly the airplane, and accomplish all the applicable preflight inspections and planning.
Determine direction of rotation of propeller - clockwise rotation (as viewed from the cockpit) will require right rudder at high power, counterclockwise rotation will require left rudder.
Increase taxi speed by no more than 5 knots/mph on each run. Do not increase the speed until everyone on the test team is satisfied with the aircraft and test pilot performance at the speed of the previous run.
At 80% of the predicted stall speed, the test pilot should be able to raise the tail (or nose on a nose-dragger). If unable, research the CG and landing gear location, there is a problem. With the tail raised, adjust the stab trim to zero stick pitch forces. This will be the initial “Take Off Trim” position. Mark the trim position indicator as appropriate. Do not move the trim position so that rigging adjustments can be made as necessary. Note the stick forces required to raise the tail. The stick travel required to raise the tail should not exceed 25% of the longitudinal range of travel. If it does, consider CG or gear placement problems.
As 80% of the stall speed is approached, the test pilot will test the effectiveness of the ailerons by attempting to rock the wings SLIGHTLY! Be aware that a misrigged aileron could cause the test pilot to drag a wing with a relatively small control input.
Duplicate taxi tests with the flaps/speed brake extended to determine any pitch authority changes or instability induced by these devices. Record this information and incorporate it in the Aircraft Flight Manual as a note, caution, or warning.
Determine the approximate point on the runway where lift off will occur and mark it with a green flag at the edge of the runway. Coordinate the use of runway markers with the FBO/airport authority.
Determine how much runway will be required to stop in the event of a high speed abort. This distance is determined by accelerating to 80% of stall speed, then at a preplanned execution point at least 1600 feet from the end of the runway, pulling the throttle to idle and applying maximum braking to bring the aircraft to a complete stop. (The 1600 foot minimum is the estimated stopping distance required from smooth lift-off speed as extracted from AC 90-89A) Use caution not to tip the aircraft on it’s nose. Measure the distance from the preplanned execution point to the point where the aircraft came to a complete stop. Once this distance is determined (after multiple test runs), add 30% and measure this distance back from the departure end of the runway. (Just so there is no confusion, the departure end is the end you will be stopping at or flying over, NOT the end you begin the take-off roll from.) Mark it with a red flag -- this is your “go - no go” decision point for the flight tests.
Performs “skips” or “land-backs” to explore the ground effect handling characteristics. The purpose of this procedure is to familiarize the test pilot with the landing characteristics of the aircraft (ground effect handling, float, effects of power modulation, etc.) Extreme caution must be exercised to apply only the amount of power required to lift the plane off in ground effect and then land again before the “go - no go” point on the runway is reached. Applying and maintaining full power till lift off will cause you to make an unintentional first flight. Retard the throttle to maintain no more than 5 knots above the anticipated stall speed of the aircraft during the skips. This phase of testing must be approached with a great deal of discipline as the temptation to perform a premature first flight will be high. This is your opportunity to learn how to land the airplane without having to worry about getting it slowed down to landing speeds.
Measure the stick travel required to get the airplane airborne. Again, stick travel should not exceed 25% of the total range of travel from center.
Taxi testing is complete when everyone on the test team is satisfied with the performance of the aircraft and the test pilot.
Inspect the aircraft thoroughly with special attention to the landing gear, brake system, engine and propeller. ALL DISCREPANCIES MUST BE FIXED BEFORE MOVING TO THE FLIGHT PHASE OF TESTING. Examine all fuel system filters and screens for metal, and change the oil and oil filter, again inspecting for metal. After this procedure is complete, perform a leak check on the engine and fuel system by performing a run-up check and then inspecting the engine for leaks.
Flight Tests
Chase Plane Procedures
If you can’t find anyone with formation flying or chase experience, DO NOT USE A CHASE PLANE. The increased risk is not worth the benefit the chase plane provides. A chase plane will be used for the first flight and any following flights at the discretion of the test pilot. The chase plane will serve the following functions:
Observe the aircraft for indications of problems not visible to the test pilot
Clear for other traffic in the test area
Assist in an emergency situation
Maintain situational awareness on the closest emergency landing field at all times and be ready to direct the test pilot to this field.
The chase position will be 100 to 200 feet at either the 4 o’clock or 8 o’clock position and slightly below the test aircraft. This position affords the chase aircraft the best vantage point for observing the test aircraft and clearing ahead for traffic while maintaining a position so as not to distract the test pilot. The low 6 o’clock position should be avoided as anything falling or breaking off the test aircraft is likely to hit an aircraft in this position.
The chase aircraft will have a minimum crew of two. The primary pilot will be responsible for flying the aircraft and maintaining a safe distance from the test aircraft, and the second pilot will be responsible for all other duties listed above. The chase plane crew will be thoroughly briefed on the test profile to be flown and will fully understand their responsibilities and expected communications.
Chase Plane Briefing
Pilot qualification requirements
Crew composition
Crew responsibilities
Formation positions
Hand signals
Emergency procedures
Test profile
Emergency Procedures
Objective
Develop a complete set of in-flight emergency procedures while calm and on the ground at zero knots that are designed to make unmanageable 100+ knot airborne situations manageable
General
The first step in any emergency procedure is FLY THE AIRPLANE. To quote the United States Air Force approach to emergency procedures, “Maintain aircraft control, analyze the situation, and take the appropriate action”. It doesn’t get more straight forward than that.
Specific EP’s to be addressed:
Brake Failure
Blown Tire
Engine Failure on Take Off
Engine vibration increases with RPM
Smoke in the cockpit
Fire in the cockpit
Engine fire
Flight controls jammed
Out of rig condition
Canopy open in flight
Unusual Attitude Recovery
Spin Recovery
Electrical System Failure
Lost communication
Throttle stuck/unresponsive
Oil on windshield
Oil System Malfunction
Propeller throws a blade
Flight Procedures
General
Maintain a disciplined and professional approach to testing the aircraft at all times. All discrepancies discovered during flight testing will be fixed before the next flight is conducted – NO EXCEPTIONS!
Clearing turns will be accomplished before the start of in-flight maneuvering. On the first flight, the chase plane will be responsible for clearing the area for traffic.
First Flight
Objective
Determine engine reliability and flight control characteristics, particularly in the landing regime of flight. Test Duration - One sortie, 1 hour long.
Data Points to be Collected
Engine performance
oil pressure within limits
oil temperature within limits
Fuel pressure within limits
EGT within limits
CHT within limits
Effect of carburetor heat
Flight Control Effectiveness and Handling Qualities
Yaw characteristics
Roll characteristics
Pitch characteristics
Speed brake effects
Landing regime parameters
Approximate stall speed
Low speed stability and handling characteristics
Procedures
Thorough review of all emergency procedures with the support crew and chase aircraft crew
Thorough preflight according to preflight checklist
Preflight data collection equipment
Perform all checklist items through Engine Start, and allow the engine to warm up to operating temperature.
Perform a complete check of all aircraft systems
Engine operation and engine instruments
Flight controls - free and clear, proper movement
Brakes
Flight instruments
Avionics
Lights (strobes)
Advise tower/Unicom that an experimental aircraft is on it’s first test flight, taxi to the active runway and request take off instructions.
Once cleared for take off, release the brakes and slowly advance the throttle to full power, listening for any abnormal sounds or other indications of engine trouble. Confirm that the tach, manifold pressure and oil pressure are “in the green”. If any abnormality is noted on engine performance, ABORT THE TAKE OFF.
Keep the tail wheel on the runway until the rudder is effective (approximately 35 mph).
As the aircraft approaches the expected lift off speed (should be at the green flag you positioned during taxi tests), gently ease the stick back. Strive to make the first take off gentle and well-controlled, allowing the aircraft to fly itself off the runway.
If the aircraft does not want to rotate, unusual stick forces are encountered, you reach the “go/no-go” red flag, or any other unusual or unexpected event occurs, ABORT THE TAKE OFF. Do not attempt to “pull” the aircraft into the air. If you DO become airborne after this maneuver, the flight will very likely terminate with a crash landing precipitated from a stall or pilot-induced oscillation (PIO) immediately after the pitch-up.
Once airborne and a safe climb angle is established, do not make any throttle changes or excessive control inputs until above 1,000 feet.
Climb to 3,000 feet AGL and level off.
Execute Cruise checklist.
Reduce power slowly to maintain no more than 75 mph (approximately 1.5 the anticipated stall speed). This speed will reduce the chance of control surface flutter. Reference Flight Testing Homebuilt Aircraft for a more detailed discussion of flutter.
Monitor engine performance
If the engine is not operating smoothly or parameters are out of limits, land immediately and trouble shoot.
If the engine is operating smoothly and within ops limits, continue with flight control tests.
Execute flight control tests
All initial flight control inputs will be smooth and small. Any abrupt or abnormal response to initial control inputs may indicate a rigging problem. Control pressures should increase in proportion to control deflection. If control pressures do not change or stick forces lighten as deflection increases, the aircraft may have a stability problem. If the aircraft is unstable at any point in the test sequence, set up for a straight-in landing as soon as possible, avoiding large control inputs. The tests executed during this flight are primarily designed to prepare the test pilot to land the aircraft by identifying any control problems in the approach to landing flight regime.
Neutral Stick Stability - stabilize the aircraft in unaccelerated level flight and release the stick, noting aircraft response.
Rudder - yaw the aircraft 5 degrees to the left and right and release rudder pressure. Note rudder pedal deflection required and aircraft handling qualities. Yaw should dampen out within 5 oscillations. Arrest oscillations if necessary by resting feet on rudder pedals to maintain neutral rudder.
Elevator - raise the nose 3 degrees, stabilize the climb, and trim. Note stick deflection. Level off and retrim. Lower the nose 3 degrees, trim, and note stick deflection. Level off and retrim.
Ailerons - bank 5 degrees to the left and then to the right. If the aircraft is operating smoothly, perform several 90 degree clearing turns at no more than 10 degrees of bank. Follow this with two 360 degree turns at 10 degrees of bank, one to the left and one to the right. Increase the bank angle for succeeding turns to 20 degrees.
Execute Climb Checklist and climb to 5,000 feet AGL. Closely monitor engine instruments during the climb.
Simulate a traffic pattern at 5,000 feet. Test the flaps/speed brake effectiveness. Note changes in trim/attitude/power required to maintain level flight. Confirm at least 25% of aft stick travel remains.
Execute the Descent and Before Landing Checklists, and practice an approach to landing at 4,000 feet AGL, and then again at 3,000 feet AGL. Use an approach speed of 65 mph (approximately 1.3 times the expected stall speed).
Clean up the aircraft, execute the Climb Checklist, and climb back to 5,000 feet AGL.
Fly straight and level at 75 mph for about 10 minutes, trimming the aircraft as well as possible. Note the trim position and use it as your new take off trim position. Use this time to rest a bit, collect and record your thoughts, and observe the level flying characteristics of your aircraft. Note any required changes to rudder and aileron trim tabs. The stick should be slightly forward of the mid position in level flight.
Execute an approach to stall maneuver. The purpose of this maneuver is to further demonstrate the low speed handling characteristics of the aircraft, and to determine a reference speed to be used as the preliminary stall speed to calculate the approach speed for the first approach to landing.
Execute clearing turns.
Stabilize airspeed, heading, and altitude.
Apply carb heat
Establish landing configuration
Reduce power to about 1000 RPM and trim.
When the airspeed reaches 70 mph (1.4 times predicted stall speed), raise the nose slowly so as to maintain altitude, and keep the ball/turn coordinator centered. Note the rate of deceleration, which should be approximately 1/2 mph per second, and observe the changes in attitude, stick forces, and rudder required.
Make small control inputs during the deceleration at about 5 mph intervals to confirm proper aircraft response, particularly in negative pitch, as the aircraft slows down. Discontinue the test if elevator authority decreases to an unacceptable level (i.e. you exceed 75% of the total stick travel range or your ability to recover from the nose-up attitude becomes questionable).
At the onset of pre-stall indications (i.e. buffet, loss of aileron effectiveness, nose rise, etc.) or upon reaching 50 mph, discontinue the test, recover the aircraft, and record the indicated air speed at which the buffet occurred. This is the reference stall speed for the first landing.
Recovery from the stall onset should be a smooth and quick forward stick movement.
Be prepared to counter any wing drop with rudder, not aileron. In a near-stalled condition, aileron input may induce a stall or sudden entry into a spin.
(Insert discussion of the five phases of flight that evolve into a spin, and how to recover from each)
(Stall warning)
(Stall)
(Departure)
(Post-stall gyration)
(Incipient phase)
(Fully developed spin)
Practice recoveries from pre-stall buffet until the test pilot is comfortable with his ability to recognize the pre-stall characteristics and recover the aircraft in the landing configuration.
Execute the Descent and Before Landing Checklists, and enter the traffic pattern for several low approaches to familiarize the test pilot with the aircraft’s handling characteristics in ground effect.
Use a final approach speed between 1.3 and 1.4 times the reference pre-stall speed. Using 50 mph as a reference speed, this would be between 65 and 70 mph (nominally 70 mph). Have your chase plane crew back up your calculations. You DO NOT want to be too slow on final approach!
Land the aircraft
Plan a touchdown point within the first 1,000 feet of the runway.
Plan to go around. If the landing conditions are not ideal, or you reach the red flag (go/no-go) before you are able to apply the brakes, or you don’t like the situation for ANY reason, GO AROUND.
After landing, fly the aircraft all the way to the chocks, and be sure to execute the After Landing, Before Engine Shut Down, and Engine Shut Down Checklists.
Secure the aircraft, perform a detailed post-flight inspection, and debrief the flight with the ground and chase plane crews. Note any squawks, no matter how minor, and ensure they are all fixed prior to the next flight. Get a clean flight suit!
Congratulations, it actually flies!!! Pop the champagne, and celebrate your accomplishment! Do NOT plan to fly the second flight on the same day (popping the champagne assures this won’t happen!). Use the rest of the day to analyze the data you collected, make any necessary adjustments or repairs, assess the aircraft performance and make any necessary adjustments to your flight testing approach. Prepare yourself and the aircraft for the second flight.
(Insert section on data analysis – define method of collating/reducing/recording data and findings. Begin squawk record)
Second Flight
Objective
Reaffirm the first flight findings and verify adjustments and corrections made as a result of first flight data analysis.. Test Duration - Minimum of one sortie, one hour long.
Data Points to be Collected
Same as first flight
Test Procedure
Confirm all squawks from the first flight are fixed
Perform a complete engine run-up series if adjustments/alterations were made to the engine, propeller, baffling, or fuel system.
Perform low/high speed taxi tests if adjustments/alterations were made to the engine, propeller, landing gear, brakes, flight controls, flight control rigging, canopy latching mechanism, cowling, or anything else that may affect ground handling or in-flight control.
Execute first flight procedures, concentrating on areas where discrepancies were noted on the first flight. If discrepancies are repeated, halt further testing until a solution can be found. Apply a root cause analysis process to aid in discrepancy resolution. Reference Appendix XYZ for root cause analysis methods.
Perform a detailed post flight inspection, and correct ALL squawks before proceeding to the next fight test.
Confirm or reject the data collected on the first flight. Evaluate the need to gather more data on the “first flight” parameters before progressing further in the flight test plan. Repeat the “first flight” procedures on the next flight and subsequent flights if required to collect all the necessary data points..
Engine Performance Validation Tests
Objective
To validate engine performance paramaeters and reliability. Test Duration - Minimum of 1 sortie, one hour long.
Data Points to be Collected
Oil pressure
Oil temperature
Fuel pressure
CHT
EGT
Manifold pressure
Fuel flow
Test Procedure
Confirm all squawks from the previous flight are fixed.
Do not exceed 80% of max cruise speed (nominally .8 x 180 = 146 mph) to avoid control surface flutter.
Collect data on the following parameters in 5% increments from 55% to 75% RPM, not to exceed 80% of cruise speed, with the mixture full rich. Stabilize for a minimum of 2 minutes at each increment before recording data, and also record the airspeed and pressure altitude (or outside air temperature and indicated altitude to calculate pressure altitude during post flight analysis).
(see “Data Points to be Collected” section above)
Repeat the above procedure with the mixture leaned to max EGT.
Repeat the above procedure with the carb heat on.
Conduct a thorough post flight inspection, and record fuel and oil consumption.
Make adjustments as needed. The test pilot should make an initial determination on the aircraft stability and engine reliability.
Fix all squawks before the next flight. Evaluate the progress of the flight test program and make any necessary modifications.
Engine Reliability Validation
Objective
To build on the data established in previous tests and start expanding on the flight test envelope in a thorough and cautious manner. This operational data will be added to the Flight Manual. Duration - Minimum of six sorties, one hour per sortie.
Data Points to be Collected
Climb and descent from and to a preselected altitude (monitor engine parameters)
Test Procedure
General
These tests are focussed on engine performance. It is not intended to gather reliable aircraft performance data (best rate of climb, best angle of climb, etc.) at this time. These tests will be conducted using a stair step method of climbs and descents from a baseline altitude. The climb and decent procedures are described separately below, but will be performed in an alternating manner in flight.
Climb Tests
Climb to 1,000 feet AGL, reduce power, trim for and maintain straight and level flight so as to maintain 80% of max cruise speed, for a minimum of 10 minutes to stabilize oil pressure and temperature.
Apply full power, raise the nose 5 degrees, trim and maintain climb for 1 minute. Record (expand this section to include a table to record data) airspeed and all engine temperatures and pressures. DO NOT EXCEED RECOMMENDED MAXIMUM TEMPERATURE/PRESSURE
Reduce power, trim for level flight, and allow temperatures and pressures to stabilize.
Repeat climb test at 5 degrees, this time for 2 minutes. Record temperature and pressure data.
Repeat test, increasing climb time by 1 minute each time until temperatures and pressures reach a maximum value (i.e. stop increasing) or 5 minutes of climb time at full power is reached.
Increase climb angle to 10 degrees and incrementally increase climb times until temperatures and pressures reach a maximum value or 5 minutes climb time at full throttle is reached.
Increase climb angle to 15 degrees and repeat procedure.
Descent Tests
Stabilize the aircraft at 5,000 feet AGL. Clear the airspace below the aircraft, execute the Descent Checklist, and set power so as to descend at a maximum airspeed of 1.5 times the expected stall speed (nominally 75 MPH) at a shallow (< 5 degrees) descent angle. Continue for 30 seconds and record engine data.
Repeat as in the climb test, incrementally increasing the descent duration in 30 second increments and the descent angle as appropriate.
NOTE: If a significant drop in CHT occurs (>30 F degrees), increase RPM and decrease descent angle to avoid shock cooling the cylinder heads.
Record all temps, pressures, altitudes and airspeeds for inclusion in the Flight Manual. (expand to include data recording table)
Perform a “Condition Annual Inspection” using the following checklist after all flights in this phase have been completed.
Check torque on engine mount, prop, and landing gear bolts.
Check hinges and rod end bearings for attachment and play.
Check cable installations and tension, as well as control travel.
Check oil and fuel systems for metal or other contaminants
Perform a CO inspection to ensure operational vibration has not opened any leaks.
Stability Tests and Control Checks
Objective
To determine the aircraft’s stability limits and range of control. Test Duration - Minimum of fifteen sorties, one hour each.
Data Points to be Collected (to be expanded on)
Test Procedure
General
All tests will commence from a state of equilibrium (straight and level, unaccelerated flight)
Test for Static Longitudinal Stability
Test for Static Longitudinal Stability
Trim for zero stick forces with the aircraft in equilibrium at a low cruise speed (100 mph would work well).
Without trimming again, pull slightly on the stick and stabilize at a speed 10% lower than starting speed (90 mph). Back pressure should be required to maintain this speed. If it is, apply further back pressure and stabilize at 20% below starting speed (80 mph).
If back pressure is still required, the aircraft exhibits positive static longitudinal stability (GOOD). If no force is required, static longitudinal stability is neutral (MARGINAL). If a push on the stick is required, static longitudinal stability is negative (BAD), and you must stop the test program and correct this condition (i.e. IT'S DANGEROUS!)
Test for Dynamic Longitudinal Stability
Short Period Test
Trim for zero stick forces with the aircraft in equilibrium at a normal cruise speed.
Without trimming again, push the nose down about 3 degrees with a smooth but fairly rapid motion.
Quickly pull on the stick to bring the pitch attitude to 3 degrees above the original trimmed attitude.
Push the stick forward toward the original trimmed attitude.
As the attitude approaches the trim attitude, release the stick (but continue to guard it).
Observe and record the pitch oscillation. An aircraft with positive dynamic longitudinal stability will dampen the pitch oscillation and return to the originally trimmed attitude. Look for this to happen in less than 10 oscillations.
Long Period Test
Trim for zero stick forces with the aircraft in equilibrium at a normal cruise speed.
Without trimming again, push the nose down until a speed about 5 mph above the trimmed speed is reached, then release the stick (again guard it).
Positive stability will dampen the oscillations to the trimmed airspeed, neutral stability will continue to oscillate with constant magnitude, and negative stability will continue to oscillate with increasing magnitude (diverging oscillation). None of these conditions are dangerous, but an aircraft with divergent dynamic longitudinal stability will require constant attention and will be difficult to trim.
Test for Lateral-Directional Stability
Lateral Stability Test
Climb to 5000 feet AGL and trim for low cruise in straight and level flight.
Slowly enter a side slip. The aircraft should be able to hold heading with rudder at a minimum bank angle of 10 degrees. Control forces and deflections should increase steadily, but not necessarily in proportion with one another, until either the rudder or ailerons reach full deflection or the maximum side slip angle is reached.
Release the ailerons while still holding full deflection on the rudder. The aircraft should roll towards wings level.
Record lateral stability observations.
Repeat process for side slips in both directions.
(Discuss Dutch roll and what it indicates)
Directional Stability Test (this is written more as a procedure, need to expand into plan verbage.)
Climb to 5000 feet AGL and trim for low cruise in straight and level flight.
Slowly yaw the aircraft using the rudder, keeping the wings level with aileron.
Release the rudder. The aircraft should tend to return to straight flight.
Record directional stability observations.
Repeat process for both left and right yaw.
Test for Spiral Stability
Climb to 5000 feet AGL and trim for low cruise in straight and level flight.
Enter a 15 to 20 degree banked turn in either direction and release the controls.
Bank angle decreases - positive spiral stability
Bank angle constant - neutral spiral stability
Bank angle increases - negative spiral stability
As with negative dynamic longitudinal stability, negative spiral stability is not necessarily dangerous, but the aircraft will require constant attention and will be more difficult to fly.
Airspeed Indicator In-Flight Accuracy, “V” Speed Determination and Slow Flight Tests
Objective
To determine airspeed indicator accuracy, and determine/validate Best Rate of Climb, Best Angle of Climb, and explore slow flight handling characteristics. Test Duration: Minimum of ten sorties, one hour per sortie.
Data Points to be Collected
Airspeed indicator in-flight accuracy
Stall speed
Best rate of climb
Best angle of climb
Slow flight handling and performance
Test Procedure
Airspeed In-flight Accuracy Test
The most accurate way to measure the airspeed indicating system accuracy is to time how long it takes to fly a triangular course of equal legs at a constant altitude and indicated airspeed. Use an E6B or other computer to convert this ground speed to true indicated speed (you will also need to know the altitude and OAT to perform this calculation.) The difference between the calculated airspeed and the indicated airspeed is the installation and indicator error.
Start the test at the lowest safe airspeed and repeat it in increases of 10 mph/knot increments until reaching cruise speed. Errors will be greatest at low speeds due to the angle of attack of the pitot mast.
GPS may be used to validate the data collected while flying the course.
Record all of the data and prepare an airspeed calibration table for the Flight Manual.
Conduct a thorough post flight inspection and assure all squawks are fixed before the next flight.
Best Rate of Climb/Best Angle of Climb Tests (need to expand this section, state separate objectives, data to be collected, and procedures)
Perform a series of vertical “S” maneuvers before beginning these tests to get a feel for maintaining airspeeds in climbs and descents. This will aid in hitting and holding accurate test points.
Stabilize the aircraft in straight and level flight at 1000 feet AGL, 90 degrees to the wind, at a speed 15 mph/knots faster than the predicted best rate of climb speed.
Apply full power and begin a climb at an attitude that will maintain your starting airspeed.
Passing through 1100 feet AGL (or any other convenient reference altitude), hack a stopwatch and time your climb for one minute.
Level off and record the altitude gained in one minute at the target airspeed.
Descend to 1000 AGL, stabilize at a speed 5 mph/knots slower than the first test, and repeat the procedure.
Repeat this process, decreasing the speed by 5 mph/knots each time, until the rate of climb shows a decreasing trend.
Plot this data on a graph of Rate of Climb vs. Airspeed to determine the best rate of climb airspeed.
Best Angle of Climb is determined using the same graph from the best rate of climb test. Draw a line from the origin (zero point) of the graph tangent to the best rate of climb curve. The point of intersection is the best angle of climb speed.
Slow Flight Tests (to be expanded on)
The primary purpose for these tests at this point in the test program is for the test pilot to become familiar with the aircraft’s handling qualities at minimum airspeeds and power settings. The “real” slow flight and stall speeds will be determined later in the test program at full gross weight.
Climb to 6000 feet AGL and set the speed at 1.3 times the stall speed. Once stabilized, reduce the airspeed 5 mph/knot increments until you are 5 knots above the predetermined stall speed.
Observe, qualitatively evaluate, and record the slow flight characteristics. Maneuver as required, keeping bank angles at 5 degrees or less to avoid unplanned stalls.
Repeat the process with flaps/speed brake extended.
Perform a “Condition Annual Inspection” in accordance with the following checklist.
Check torque on engine mount, prop, and landing gear bolts.
Check hinges and rod end bearings for attachment and play.
Check cable installations and tension, as well as control travel.
Check oil and fuel systems for metal or other contaminants
Perform a CO inspection to ensure operational vibration has not opened any leaks.
Envelope Expansion
Objective
To develop aircraft performance data across the weight and CG ranges. Test Duration - Minimum of ten sorties, one hour each.
Data
Points to be Collected (to be expanded on)
Airspeed indicator accuracy
Determine all of the following at full gross weight:
CG range
All “V” speeds
Stability characteristics
Slow flight characteristics
Test Procedures
General
Repeat the applicable test procedures defined in earlier phases of the test
plan at increasing gross weight until full gross weight is achieved. All ballast must be attached securely to the
airframe (define specific points where ballast will be loaded). If using bags of shot or sand, secure each
bag individually and then cover all the ballast with a cargo net. Once maximum gross weight is achieved,
explore the CG envelope by incrementally moving the CG back and repeating the
tests again. DO NOT EXCEED THE
ADVERTISED CG RANGE OR CONTINUE PAST A STOP POINT. FAILURE TO HEED THIS WARNING MAY LEAD TO AN
UNRECOVERABLE FLIGHT CONDITION.
Maximum Gross Weight Tests
Increase weight in 20% increments for each flight.
Change CG to aft by 20% of CG range for each flight after reaching full gross weight.
STOP POINTS
Neutral or negative stability develops
Unsatisfactory stall characteristics develop
Exceed 75% stick travel range deflection non-manuevering
Service Ceiling Tests
Coordinate with the local Flight Standards District Office to amend the Operating Limitations to permit a climb above 18,000 feet MSL if you think you can get that high. Also get a waiver if you don’t have a transponder.
Coordinate with the local Flight Service Station or ATC facility to schedule airspace to make the test.
Install a portable oxygen system if you plan to go above 12,000 feet MSL
Review the engine manufacturer’s mixture leaning procedures.
Conduct the test
Climb in a series of 1000 foot steps until you can no longer maintain a 100 foot per minute climb rate.
At each altitude step, thoroughly examine the engine instruments and evaluate aircraft control capability. Stop the test if either becomes suspect.
Stall Tests (define stall, departure, go into excrutiating detail about methodology to use and procedures to follow.)
The first series of stall tests should be started with the aircraft in a
forward CG condition to reduce the potential for spins. Successive testing will be done at full gross
weight with the CG moved progressively further aft until the entire CG range
has been tested or you reach a safety of flight stop point. Begin the tests at a minimum of 6000 feet AGL
to allow ample room for recovery from inadvertent spin entry or unusual attitudes. While performing the stall tests, look for
the ideal of a “warning buffet” 5 -10 knots above stall speed, and then a clean
break with the nose falling straight forward with no tendencies for pitch up or
wing drop during the departure. Any deviation
from the ideal should be noted for inclusion in the Flight Manual.
Execute the power on stall tests with an incremental approach, starting at low
power settings and incrementally increasing the power for each successive stall
until full power is reached. Remember to
keep the ball centered, and be prepared to counter wing drop WITH RUDDER during
the stall recovery as it is more likely for this condition to occur during
power on stalls. WARNING: USING AILERON TO COUNTER WING DROP IN A POWER
ON STALLED CONDITION MAY LEAD TO SPIN ENTRY!
KEEP THE STICK CENTERED LATERALLY UNTIL FLYING AIRSPEED IS
REGAINED. Use the highest stall speed
determined during these tests to set the aircraft stall warning system, if so
equipped. The stall warning should be
set to sound 5 mph/knots above the highest stall speed encountered.
Review out of control flight and recovery procedures. (Detail expected recovery procedures)
Power off stalls
Stabilize the aircraft in level flight.
Reduce speed to 1.3 times the expected stall speed, trim, and look for indications of the approaching stall (buffet, loss of aileron effectiveness, nose rise, nose slice, wing drop, etc.). CAUTION: IT IS VERY IMPORTANT NOT TO TRIM INTO THE STALL. LEAVE THE AIRCRAFT TRIMMED TO 1.3 VS TO AID IN RECOVERY AFTER THE STALL.
Pull the throttle to idle and apply back pressure to the stick so as to maintain altitude as the speed bleeds off at about ½ mph/knot per second. If the aircraft is slowing too quickly for accurate observation of speeds and handling characteristics, allow the aircraft to descend while slowing at a more controlled rate. Expect things to happen very quickly, especially the first time this procedure is executed.
Confirm that the turn and bank indicator is centered (needle and ball).
Observe and record the power off stall warning indications and the speed at which they start.
Observe and record the aircraft stall characteristics and the speed at which the stall occurs.
Recover from the stall by relaxing stick back pressure, apply power, and execute a dive recovery once the aircraft has flying airspeed.
Observe and record recovery characteristics and altitude lost during the recovery..
Record all observations for inclusion in the Flight Manual.
Repeat the above test procedures for all possible configurations and gross weights and record stall speed data.
Power on stalls
Stabilize the aircraft in level flight at a low cruise power setting.
Increase the pitch attitude at this power setting until the stall buffet is reached, then hold the pitch attitude with the ball centered.
Observe the speed at which the stall occurs and the power on stall characteristics.
Recover from the stall by relaxing back pressure, reduce power, stop any rotation WITH RUDDER ONLY, and recover from the dive.
Record observations for inclusion in the Flight Manual..